Getting Started
Installation guide and first-run configuration for Deprixa Plus on your server.
System Requirements
Deprixa Plus requires a standard LEMP or LAMP stack. The following are minimum and recommended specifications.
| Component | Minimum | Recommended | Notes |
|---|---|---|---|
| PHP | 8.2 | 8.3+ | Extensions required: BCMath, Ctype, cURL, DOM, Fileinfo, JSON, Mbstring, OpenSSL, PCRE, PDO, Tokenizer, XML, GD or Imagick |
| Web Server | Nginx 1.18 / Apache 2.4 | Nginx 1.24+ | Nginx is strongly recommended for production. Apache requires mod_rewrite. |
| Database | MySQL 8.0 | MySQL 8.0+ | MariaDB 10.6+ is also supported. PostgreSQL is not tested. |
| Node.js | 18 LTS | 20 LTS | Required only for building frontend assets. Not needed in production if you use pre-built assets. |
| Composer | 2.5 | 2.6+ | PHP package manager. |
| Redis | Optional | 7.x (strongly recommended) | Used for cache, sessions, and job queues. Without Redis, file-based drivers are used which are slower under load. |
| RAM | 1 GB | 4 GB+ | For small teams. Larger installations benefit from 8+ GB. |
| Storage | 5 GB | 50+ GB | Depends on shipment label volume and file uploads (logos, employee documents). |
| OS | Ubuntu 20.04 LTS | Ubuntu 22.04 / 24.04 LTS | macOS and Windows WSL2 are supported for local development only. Production should use Linux. |
Supported Hosting Environments
Deprixa Plus can be installed on: VPS/dedicated servers (DigitalOcean, Linode, Hetzner, AWS EC2 — full control, recommended for production), Hostinger Business or Premium shared hosting (SSH access required — see the Hostinger installation guide below), and local development servers including Laravel Herd, Laragon, Laravel Valet, Docker/Sail, WAMP, WSL2+LAMP, DDEV, Native Linux, MAMP, and XAMPP (see the local installation guide below for all 10 environments).
Basic shared hosting without SSH access is not supported because Composer and Artisan commands must be run at least once during setup.
Local Development Setup
Use this guide to run Deprixa Plus on your own computer for development or testing. Node.js is required on local machines to compile the frontend assets. Choose the environment that best fits your operating system and experience level.
10 Supported Local Environments
This section covers setup instructions for Laravel Herd, Laragon, Laravel Valet, Docker / Laravel Sail, WAMP, WSL2 + LAMP, DDEV, Native Linux, MAMP, and XAMPP. All environments require PHP 8.2+, Composer 2.6+, Node.js 20+ LTS, and MySQL 8.0+ (or MariaDB 10.6+). Pick the one you are most comfortable with and jump to its section below.
Quick Comparison
| Environment | OS | Best For | Difficulty |
|---|---|---|---|
| Laravel Herd RECOMMENDED | macOS / Windows | Fastest zero-config setup | Easy |
| Laragon RECOMMENDED | Windows | Best all-in-one for Windows | Easy |
| Laravel Valet | macOS | Lightweight CLI-driven dev | Easy |
| Docker / Laravel Sail | Cross-platform | Reproducible, containerized environments | Medium |
| WAMP | Windows | Classic Windows AMP stack | Easy |
| WSL2 + LAMP | Windows | Linux-like dev on Windows | Advanced |
| DDEV | Cross-platform | Docker-based with per-project config | Medium |
| Native Linux | Ubuntu / Debian | Direct LEMP stack on Linux | Medium |
| MAMP | macOS | Classic macOS AMP stack | Easy |
| XAMPP | Windows / macOS | Classic cross-platform AMP stack | Easy |
1. Laravel Herd (macOS / Windows) RECOMMENDED
Laravel Herd is a blazing-fast, native development environment that bundles PHP, Nginx, MySQL, and Node.js. No Docker or virtual machines required.
Prerequisites
Download and install Laravel Herd from herd.laravel.com. Herd includes PHP, Nginx, MySQL, and Node.js built-in — no extra installs needed. Make sure Composer is available globally (Herd installs it automatically).
-
1
Park Your Projects Folder
Open Herd and go to Settings → General → Paths. Add your projects directory (e.g.,
~/Sitesor~/Herd). Every folder inside a parked directory automatically becomes a.testdomain. -
2
Extract Project Files
Extract the downloaded ZIP into your parked directory. The folder name becomes the URL:
bash# Extract to ~/Herd/deprixa-plus # URL will be: http://deprixa-plus.test -
3
Install Dependencies
bashcd ~/Herd/deprixa-plus composer install -
4
Configure Environment
bashcp .env.example .env php artisan key:generateOpen
.envand setAPP_URL=http://deprixa-plus.test,APP_ENV=local, andAPP_DEBUG=true. -
5
Build Frontend Assets
bashnpm install && npm run build php artisan storage:link -
6
Create Database and Run Wizard
Open TablePlus (or any MySQL client) and create an empty database named
deprixa_plus. Then open your browser and visit:URLhttp://deprixa-plus.test/installFollow the 5-step wizard. Use
127.0.0.1as the database host androot/ empty password (Herd default).
Pro Tip
Use herd secure deprixa-plus to enable HTTPS locally. Herd also lets you switch PHP versions instantly via the menu bar — useful for testing compatibility.
2. Laragon (Windows) RECOMMENDED FOR WINDOWS
Laragon is a portable, fast, and lightweight development environment for Windows. It auto-creates virtual hosts and includes Apache, MySQL, PHP, Node.js, and more.
Prerequisites
Download and install Laragon Full from laragon.org. The full edition includes PHP 8.2+, MySQL 8, Apache, Node.js, npm, Composer, and HeidiSQL. Ensure PHP 8.2+ is selected in Laragon → Menu → PHP.
-
1
Extract Project Files
Extract the downloaded ZIP into Laragon's web root. Laragon auto-creates a virtual host for each folder:
pathC:\laragon\www\deprixa-plusThe
artisanfile must be at the root of this folder. Laragon will auto-createdeprixa-plus.testas the virtual host. -
2
Start Services
Open Laragon and click "Start All". This launches Apache, MySQL, and sets up the virtual host automatically. If prompted, allow Laragon to update the Windows hosts file.
-
3
Install Dependencies
Click "Terminal" in Laragon (or open Cmder/cmd) — Laragon adds PHP, Composer, and Node to the PATH automatically:
bash — Laragon Terminalcd C:\laragon\www\deprixa-plus composer install cp .env.example .env php artisan key:generate -
4
Build Frontend and Create Symlink
bashnpm install && npm run build php artisan storage:linkOpen
.envand setAPP_URL=http://deprixa-plus.test,APP_ENV=local, andAPP_DEBUG=true. -
5
Create Database and Run Wizard
Open HeidiSQL (built into Laragon — right-click tray icon → MySQL → HeidiSQL) and create an empty database named
deprixa_plus. Then visit:URLhttp://deprixa-plus.test/installFollow the 5-step wizard. Default Laragon MySQL credentials: host
127.0.0.1, port3306, userroot, password empty.
Pro Tip
Laragon supports switching PHP versions via Menu → PHP. You can also enable SSL per site by right-clicking the Laragon tray icon → Apache → SSL → deprixa-plus.
3. Laravel Valet (macOS)
Laravel Valet is a lightweight macOS development environment that uses Nginx under the hood. It consumes minimal resources and automatically serves sites from parked directories.
Prerequisites
Homebrew, PHP 8.2+ (via brew install php), Composer (globally installed), Node.js 20+ LTS, and MySQL 8 (via brew install mysql).
-
1
Install and Configure Valet
bashcomposer global require laravel/valet valet install # Park your projects directory cd ~/Sites valet parkEvery folder inside
~/Sitesis now automatically served asfolder-name.test. -
2
Set Up MySQL and Create Database
bashbrew install mysql brew services start mysql mysql -u root -e "CREATE DATABASE deprixa_plus;" -
3
Extract and Install Project
Extract the ZIP to
~/Sites/deprixa-plus, then install dependencies:bashcd ~/Sites/deprixa-plus composer install cp .env.example .env php artisan key:generate npm install && npm run build php artisan storage:linkSet
APP_URL=http://deprixa-plus.testin.env. -
4
Run the Installation Wizard
URLhttp://deprixa-plus.test/installFollow the 5-step wizard. Use
127.0.0.1as the host,rootas the user, and an empty password (Homebrew MySQL default).
Pro Tip
Run valet secure deprixa-plus to serve the site over HTTPS with a trusted local certificate. This is useful for testing features that require a secure connection (e.g., service workers, clipboard API).
4. Docker / Laravel Sail (Cross-platform)
Laravel Sail provides a Docker-powered local development environment. It runs MySQL, PHP, Node.js, and all dependencies inside containers — nothing needs to be installed on your host machine except Docker.
Prerequisites
Docker Desktop must be installed and running. On Windows, enable WSL2 backend in Docker Desktop settings. No local PHP, Composer, or Node.js installation required — everything runs inside containers.
-
1
Bootstrap Composer via Docker
Extract the ZIP to your desired folder, then install PHP dependencies using a temporary Docker container:
bashcd deprixa-plus docker run --rm \ -u "$(id -u):$(id -g)" \ -v "$(pwd):/var/www/html" \ -w /var/www/html \ laravelsail/php83-composer:latest \ composer install --ignore-platform-reqs -
2
Configure Environment for Sail
bashcp .env.example .envEdit
.envand set the following values for Sail's MySQL container:.envAPP_URL=http://localhost DB_HOST=mysql DB_PORT=3306 DB_DATABASE=deprixa_plus DB_USERNAME=sail DB_PASSWORD=password -
3
Start Sail Containers
bash./vendor/bin/sail up -dWait for all containers to start. The first run downloads Docker images and may take a few minutes.
-
4
Install Dependencies Inside Sail
bash./vendor/bin/sail artisan key:generate ./vendor/bin/sail npm install ./vendor/bin/sail npm run build ./vendor/bin/sail artisan storage:link -
5
Run the Installation Wizard
Sail's MySQL container auto-creates the database. Visit:
URLhttp://localhost/installIn the wizard database step, use host
mysql, usersail, passwordpassword, databasedeprixa_plus.
Pro Tip
Add alias sail='./vendor/bin/sail' to your shell profile to shorten commands (e.g., sail up -d, sail artisan migrate). Use sail down to stop all containers.
5. WAMP (Windows)
WampServer provides Apache, MySQL, and PHP on Windows. It uses a system tray icon for managing services and includes phpMyAdmin for database management.
Prerequisites
Download and install WampServer from wampserver.com. After installation, click the WAMP tray icon → PHP → Version and select PHP 8.2+. Install Composer globally and Node.js 20+ LTS separately.
-
1
Extract Project Files
pathC:\wamp64\www\deprixa-plus -
2
Create Database via phpMyAdmin
Start WAMP (tray icon should turn green), then open
http://localhost/phpmyadmin. Create a new database nameddeprixa_pluswithutf8mb4_unicode_cicollation. -
3
Install Dependencies
Open Command Prompt or PowerShell:
bash — Command Promptcd C:\wamp64\www\deprixa-plus composer install cp .env.example .env php artisan key:generate npm install && npm run build php artisan storage:linkSet
APP_URL=http://localhost/deprixa-plus/publicin.env. -
4
Run the Installation Wizard
URLhttp://localhost/deprixa-plus/public/installDefault WAMP MySQL credentials: host
127.0.0.1, userroot, password empty.
Pro Tip
If PHP is not in your PATH, add WAMP's PHP directory to your system PATH: C:\wamp64\bin\php\php8.3.x. Alternatively, use the full path to php.exe in your commands.
6. WSL2 + LAMP (Windows)
Run a full Linux LAMP/LEMP stack inside Windows Subsystem for Linux 2. This gives you a production-like environment directly on Windows with near-native performance.
Prerequisites
Install Ubuntu 22.04 (or 24.04) from the Microsoft Store. WSL2 must be enabled (wsl --install from PowerShell as admin). You will also need Node.js 20+ LTS and Composer installed inside the WSL Ubuntu instance.
-
1
Install LEMP Stack Inside WSL
bash — WSL Ubuntusudo apt update && sudo apt upgrade -y sudo apt install -y nginx mysql-server php8.3-fpm php8.3-mysql \ php8.3-mbstring php8.3-xml php8.3-curl php8.3-zip php8.3-gd \ php8.3-bcmath php8.3-intl php8.3-readline unzip -
2
Configure MySQL
bashsudo service mysql start sudo mysql -e "CREATE USER 'deprixa'@'localhost' IDENTIFIED BY 'secret';" sudo mysql -e "CREATE DATABASE deprixa_plus;" sudo mysql -e "GRANT ALL PRIVILEGES ON deprixa_plus.* TO 'deprixa'@'localhost';" sudo mysql -e "FLUSH PRIVILEGES;" -
3
Extract and Install Project
bash# Extract ZIP to /var/www/deprixa-plus cd /var/www/deprixa-plus sudo chown -R $USER:www-data . composer install cp .env.example .env php artisan key:generate npm install && npm run build php artisan storage:link chmod -R 775 storage bootstrap/cache -
4
Configure Nginx Virtual Host
nginx — /etc/nginx/sites-available/deprixa-plusserver { listen 80; server_name deprixa.test; root /var/www/deprixa-plus/public; index index.php; location / { try_files $uri $uri/ /index.php?$query_string; } location ~ \.php$ { fastcgi_pass unix:/run/php/php8.3-fpm.sock; fastcgi_param SCRIPT_FILENAME $realpath_root$fastcgi_script_name; include fastcgi_params; } }bashsudo ln -s /etc/nginx/sites-available/deprixa-plus /etc/nginx/sites-enabled/ sudo nginx -t && sudo service nginx restart -
5
Update Windows Hosts File and Run Wizard
Open
C:\Windows\System32\drivers\etc\hostsin Notepad (as Administrator) and add:hosts127.0.0.1 deprixa.testSet
APP_URL=http://deprixa.testin.envand visithttp://deprixa.test/install. Use host127.0.0.1, userdeprixa, passwordsecretin the wizard.
Pro Tip
Store your project files inside the WSL filesystem (e.g., /var/www/) rather than on the Windows mount (/mnt/c/) for significantly better I/O performance. You can access WSL files from Windows Explorer at \\wsl$\Ubuntu.
7. DDEV (Cross-platform)
DDEV is an open-source Docker-based local development tool with per-project configuration files. It supports Laravel out of the box and provides automatic HTTPS, database management, and easy sharing.
Prerequisites
Docker Desktop and DDEV must be installed. Install DDEV via Homebrew (brew install ddev/ddev/ddev) on macOS/Linux, or via the official installer on Windows. See ddev.readthedocs.io for details.
-
1
Configure DDEV Project
Extract the ZIP to a folder and initialize DDEV:
bashcd deprixa-plus ddev config --project-type=laravel --docroot=public --php-version=8.3 -
2
Start DDEV and Install Dependencies
bashddev start ddev composer install ddev exec cp .env.example .env ddev artisan key:generate ddev npm install ddev npm run build ddev artisan storage:link -
3
Configure Environment for DDEV
Edit
.envinside the project with the DDEV database credentials:.envAPP_URL=https://deprixa-plus.ddev.site DB_HOST=db DB_PORT=3306 DB_DATABASE=db DB_USERNAME=db DB_PASSWORD=db -
4
Run the Installation Wizard
URLhttps://deprixa-plus.ddev.site/installIn the wizard database step, use host
db, userdb, passworddb, databasedb.
Pro Tip
DDEV provides HTTPS automatically. Use ddev describe to see all URLs and credentials. Use ddev share to create a temporary public URL for sharing your local site with others.
8. Native Linux (Ubuntu / Debian)
Install a full LEMP stack directly on your Linux machine. This gives you a production-like environment without any abstraction layers.
Prerequisites
Ubuntu 22.04/24.04 or Debian 12+. You will install Nginx, MySQL 8, PHP 8.3-FPM, Composer, and Node.js 20+ LTS via apt and official repositories.
-
1
Install the LEMP Stack
bashsudo apt update && sudo apt install -y nginx mysql-server \ php8.3-fpm php8.3-mysql php8.3-mbstring php8.3-xml php8.3-curl \ php8.3-zip php8.3-gd php8.3-bcmath php8.3-intl unzip # Install Composer curl -sS https://getcomposer.org/installer | php sudo mv composer.phar /usr/local/bin/composer # Install Node.js 20 LTS curl -fsSL https://deb.nodesource.com/setup_20.x | sudo -E bash - sudo apt install -y nodejs -
2
Set Up MySQL and Project
bashsudo mysql -e "CREATE DATABASE deprixa_plus;" sudo mysql -e "CREATE USER 'deprixa'@'localhost' IDENTIFIED BY 'secret';" sudo mysql -e "GRANT ALL ON deprixa_plus.* TO 'deprixa'@'localhost';" # Extract project cd /var/www/deprixa-plus sudo chown -R $USER:www-data . composer install cp .env.example .env php artisan key:generate npm install && npm run build php artisan storage:link chmod -R 775 storage bootstrap/cache -
3
Quick Test with Artisan Serve (Optional)
For quick testing without configuring Nginx, you can use Laravel's built-in server:
bashphp artisan serve --host=0.0.0.0 --port=8000 # Visit http://localhost:8000/install -
4
Production-like Nginx Configuration (Recommended)
For a proper setup, create an Nginx vhost:
nginx — /etc/nginx/sites-available/deprixa-plusserver { listen 80; server_name deprixa-plus.local; root /var/www/deprixa-plus/public; index index.php; location / { try_files $uri $uri/ /index.php?$query_string; } location ~ \.php$ { fastcgi_pass unix:/run/php/php8.3-fpm.sock; fastcgi_param SCRIPT_FILENAME $realpath_root$fastcgi_script_name; include fastcgi_params; } }bashsudo ln -s /etc/nginx/sites-available/deprixa-plus /etc/nginx/sites-enabled/ sudo nginx -t && sudo systemctl restart nginx # Add "127.0.0.1 deprixa-plus.local" to /etc/hosts # Visit http://deprixa-plus.local/install
Pro Tip
Use php artisan serve for quick testing and Nginx for a production-like environment. For active frontend development, run npm run dev in a separate terminal for hot module replacement with Vite.
9. MAMP (macOS)
MAMP is a classic local server environment for macOS that bundles Apache, MySQL, and PHP with a graphical interface.
Prerequisites
Download and install MAMP from mamp.info. Also install Composer globally and Node.js 20+ LTS. In MAMP, go to Preferences → PHP and select PHP 8.2 or 8.3.
-
1
Place the Files
Extract the downloaded ZIP into MAMP's document root:
path/Applications/MAMP/htdocs/deprixa-plus/The file
artisanmust be at the root of this folder. -
2
Start MAMP and Create Database
Open MAMP and start both Apache and MySQL services. Go to MAMP → Preferences → PHP and confirm PHP 8.2 or 8.3 is selected.
Create an empty database using phpMyAdmin at
http://localhost:8888/phpmyadmin. -
3
Install Dependencies
On MAMP you may need to use MAMP's PHP binary explicitly:
bash — MAMP (macOS)cd /Applications/MAMP/htdocs/deprixa-plus /Applications/MAMP/bin/php/php8.3.x/bin/php /usr/local/bin/composer installIf Composer is not in your PATH, download it from
getcomposer.organd run it asphp composer.phar install. -
4
Configure Environment
bashcp .env.example .env php artisan key:generateOpen
.envand setAPP_URL=http://localhost:8888/deprixa-plus/public(adjust port to match MAMP's Apache port — default is 8888). SetAPP_ENV=localandAPP_DEBUG=true. -
5
Build Frontend and Create Symlink
bashnpm install && npm run build php artisan storage:linkFor active development, use
npm run devinstead ofnpm run buildfor hot module replacement. -
6
Run the Installation Wizard
URLhttp://localhost:8888/deprixa-plus/public/installFollow the 5-step wizard. Use
127.0.0.1as the host,3306as the port (or8889if using MAMP default MySQL port), androot/rootas credentials.
Pro Tip
MAMP's default MySQL port is 8889 (not the standard 3306). Check MAMP → Preferences → Ports to confirm. If using MAMP Pro, you can set up custom virtual hosts for cleaner URLs like deprixa-plus.test.
10. XAMPP (Windows / macOS)
XAMPP is a popular cross-platform Apache, MySQL, PHP, and Perl distribution. It is easy to install and works on both Windows and macOS.
Prerequisites
Download and install XAMPP from apachefriends.org (choose the PHP 8.2+ version). Also install Composer globally and Node.js 20+ LTS.
-
1
Place the Files
Extract the downloaded ZIP into XAMPP's document root:
- Windows:
C:\xampp\htdocs\deprixa-plus\ - macOS:
/Applications/XAMPP/htdocs/deprixa-plus/
The file
artisanmust be at the root of this folder. - Windows:
-
2
Start XAMPP and Create Database
Open the XAMPP Control Panel and start Apache and MySQL. Then open phpMyAdmin at
http://localhost/phpmyadminand create a new database nameddeprixa_pluswithutf8mb4_unicode_cicollation. -
3
Install Dependencies
bash — XAMPP (Windows)cd C:\xampp\htdocs\deprixa-plus composer install cp .env.example .env php artisan key:generatebash — XAMPP (macOS)cd /Applications/XAMPP/htdocs/deprixa-plus composer install cp .env.example .env php artisan key:generateSet
APP_URL=http://localhost/deprixa-plus/public,APP_ENV=local, andAPP_DEBUG=truein.env. -
4
Build Frontend and Create Symlink
bashnpm install && npm run build php artisan storage:linkFor active development, use
npm run devinstead ofnpm run buildfor hot module replacement. -
5
Run the Installation Wizard
URLhttp://localhost/deprixa-plus/public/installFollow the 5-step wizard. Default XAMPP MySQL credentials: host
127.0.0.1, port3306, userroot, password empty.
Pro Tip
On Windows, if PHP or Composer are not recognized in the command prompt, add XAMPP's PHP directory to your system PATH: C:\xampp\php. On macOS, you may need to use the full path: /Applications/XAMPP/bin/php.
Installation Steps
Deprixa Plus uses a web-based installation wizard. You prepare the server via the command line (steps 1–6), then complete the setup through your browser (step 7). Each step must complete successfully before proceeding to the next.
-
1
Extract the Source Code
Download the ZIP file from your Envato purchase page (CodeCanyon). Log in to your Envato account, go to your purchases, find Deprixa Plus, and click Download → All files & documentation.
Extract the downloaded ZIP to your web server directory. For example:
- Linux VPS/production:
/var/www/html/deprixa-plus - MAMP (macOS):
/Applications/MAMP/htdocs/deprixa-plus - XAMPP (Windows/macOS):
C:\xampp\htdocs\deprixa-plus
Upload the contents of the ZIP so that the
artisanfile is directly at the root of your chosen directory (e.g.,/var/www/html/deprixa-plus/artisan). - Linux VPS/production:
-
2
Install PHP Dependencies
Run Composer to install all backend packages. Use
--no-devin production to exclude development-only packages and--optimize-autoloaderfor a performance-optimized class map.bashcomposer install --no-dev --optimize-autoloader -
3
Configure the Environment File
Copy the example environment file and generate a new application encryption key. The key must be generated before running any other Artisan commands.
bashcp .env.example .env php artisan key:generateOpen
.envwith your preferred editor and fill in at minimum theAPP_URLand mail settings. The database credentials will be configured through the wizard in step 7. -
4
Build Frontend Assets
Pre-built assets included in the ZIP
The distribution ZIP already includes the compiled frontend in
public/build/. If that folder exists and contains amanifest.json, you can skip this step entirely — Node.js and npm are NOT required on the production server. Only run this step if you modified the frontend source code or if thepublic/build/folder is missing.If you need to rebuild the frontend (e.g., after modifying React source files), install Node dependencies and compile. Always use
npm run buildon production (notdev):bashnpm install npm run buildThe
node_modules/folder (~500 MB) is only needed during the build — do not upload it to production. Only the compiled output inpublic/build/needs to be present on the server. -
5
Configure Nginx Web Server
Point your Nginx server block to the
/publicdirectory. Below is a complete, production-ready configuration:nginxserver { listen 80; listen [::]:80; server_name yourdomain.com www.yourdomain.com; root /var/www/deprixa-plus/public; add_header X-Frame-Options "SAMEORIGIN"; add_header X-Content-Type-Options "nosniff"; index index.php; charset utf-8; location / { try_files $uri $uri/ /index.php?$query_string; } location = /favicon.ico { access_log off; log_not_found off; } location = /robots.txt { access_log off; log_not_found off; } error_page 404 /index.php; location ~ \.php$ { fastcgi_pass unix:/var/run/php/php8.3-fpm.sock; fastcgi_param SCRIPT_FILENAME $realpath_root$fastcgi_script_name; include fastcgi_params; fastcgi_hide_header X-Powered-By; } location ~ /\.(?!well-known).* { deny all; } client_max_body_size 64M; }After saving the config, enable it and test:
bashln -s /etc/nginx/sites-available/deprixa /etc/nginx/sites-enabled/ nginx -t systemctl reload nginx -
6
Set Directory Permissions and Storage Symlink
Laravel needs write access to
storage/andbootstrap/cache/. Set the owner to your web server user (typicallywww-dataon Ubuntu). Then create the public storage symlink.bashchown -R www-data:www-data /var/www/deprixa-plus chmod -R 775 /var/www/deprixa-plus/storage chmod -R 775 /var/www/deprixa-plus/bootstrap/cache php artisan storage:link -
7
Run the Installation Wizard
Open your browser and navigate to
https://yourdomain.com/install. The wizard will guide you through 5 steps:Wizard URL
Navigate to
/installon your domain. For example:https://app.yourdomain.com/install. The wizard is only accessible before the application has been installed. Once installation is complete, this URL is disabled automatically.Step 1 — Requirements Check
The wizard automatically checks that your PHP version, required extensions (
PDO,OpenSSL,cURL,Zip,Mbstring,GD), and directory permissions are met. All checks must pass before continuing.URL:
/install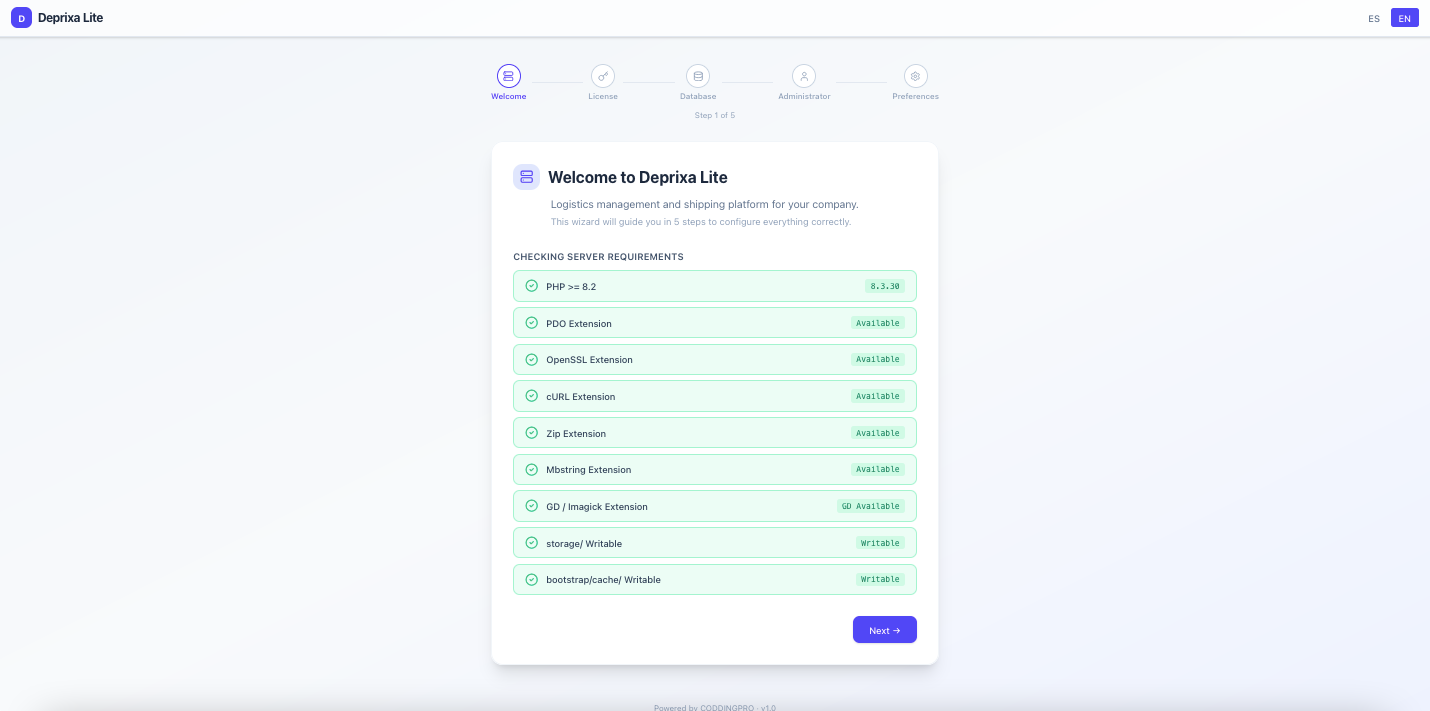
Step 2 — License Validation
Validates your Envato purchase. Enter your Envato Purchase Code and your Envato username. The system contacts the license server to confirm the purchase is valid before proceeding.
URL:
/install/license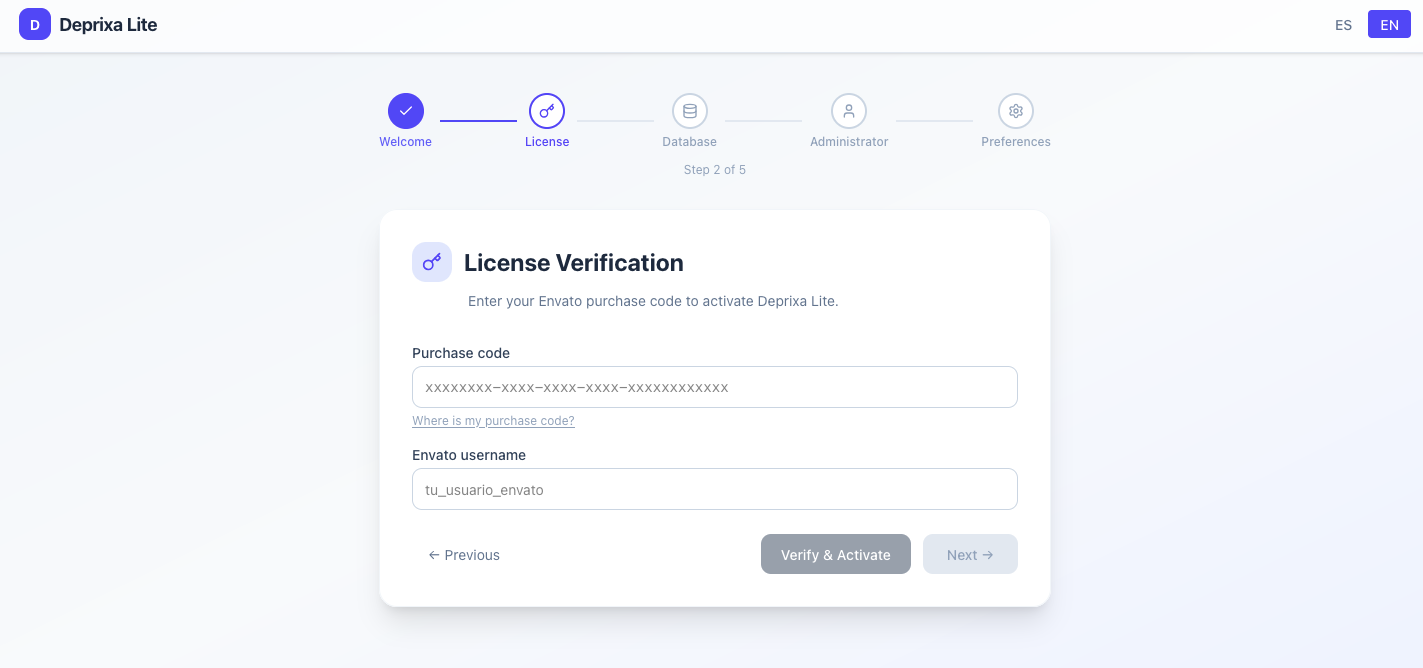
Step 3 — Database & Company
Enter your MySQL connection details (host, port, database name, username, password) and your company information (name, email, phone, country, address). The wizard creates the database if it does not exist and imports the application schema automatically.
URL:
/install/database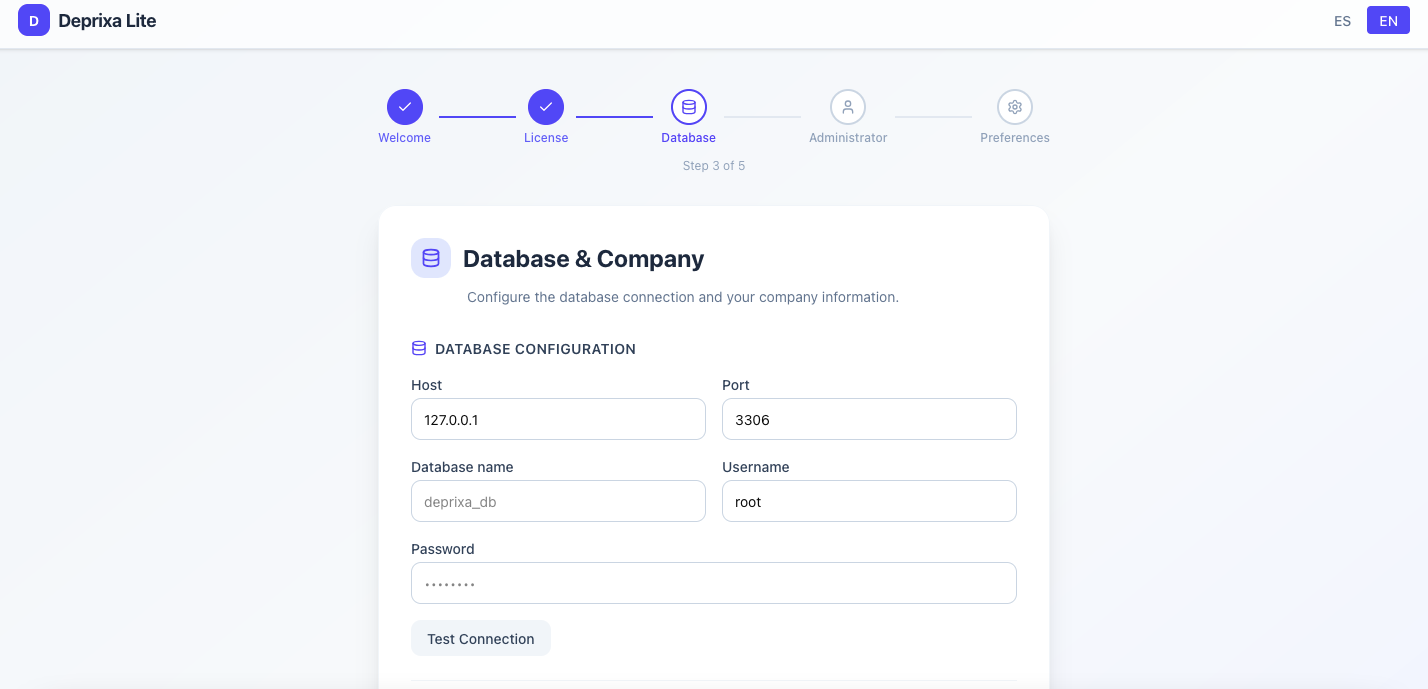
After entering your credentials, click Test Connection to verify the database is reachable before proceeding:

Step 4 — Admin User
Create the first administrator account. Enter a name, email address, and password. This account will have full Super Admin access to the system.
URL:
/install/admin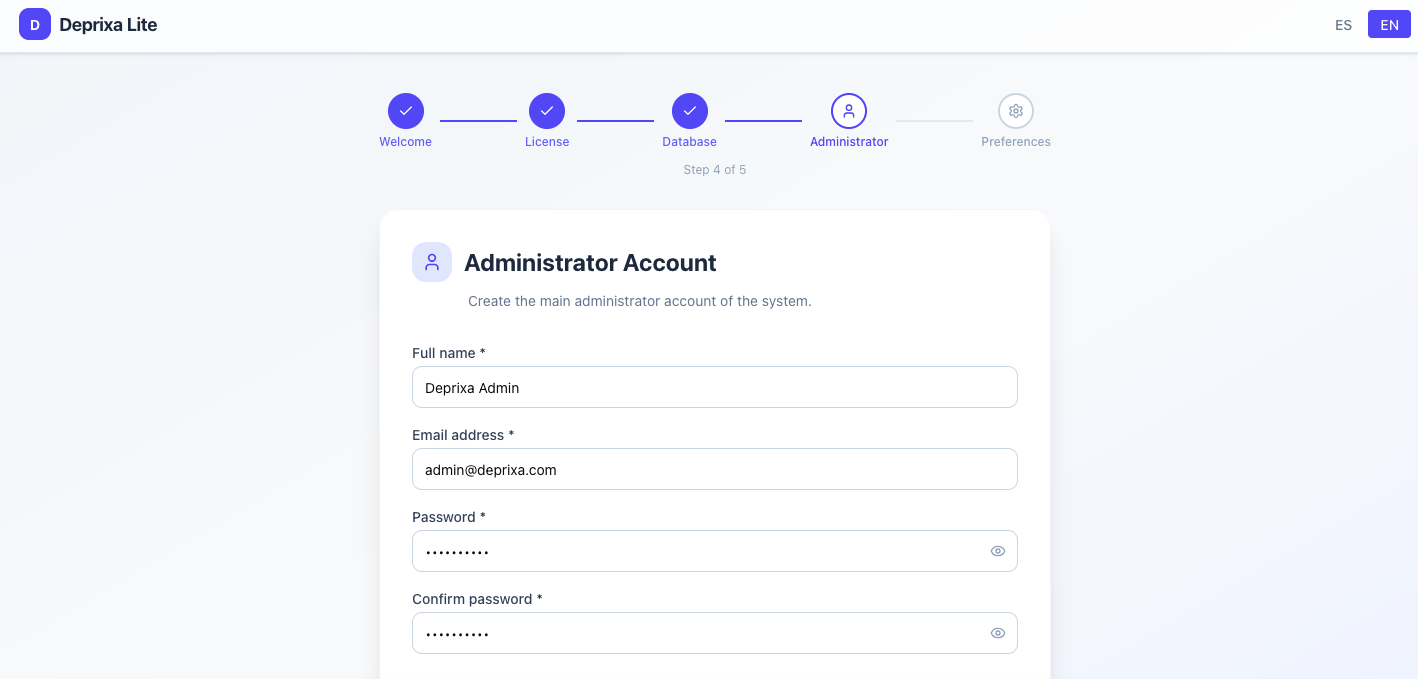
Step 5 — Preferences
Configure the system defaults: language (Spanish or English), timezone, currency, date format, weight unit (kg/lb), and dimension unit (cm/in). You can also load optional demo data to explore the system with sample shipments and customers.
URL:
/install/preferences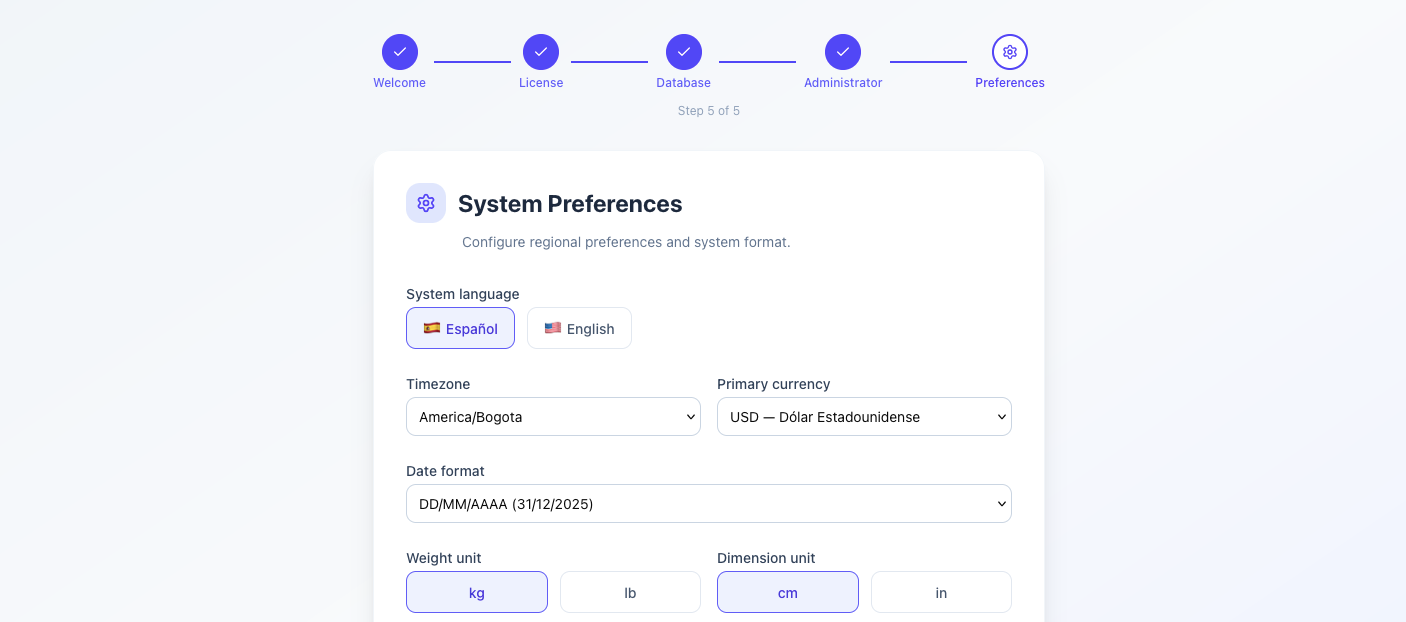
Installation Complete
Once all steps are finished, the wizard displays a success screen. You will be redirected to the login page.

Where to Find Your Purchase Code
Log in to Envato Market (codecanyon.net) → click your avatar → Downloads → find Deprixa Plus → click License certificate & purchase code. The purchase code is a UUID in the format
xxxxxxxx-xxxx-xxxx-xxxx-xxxxxxxxxxxx.When the wizard finishes, you will be redirected to
/login. Use the admin credentials you created in Step 4 to log in.
Installation on Hostinger Shared Hosting
Hostinger Business and Premium plans include SSH access and support PHP 8.2/8.3, making them compatible with Deprixa Plus. The key difference from a VPS is that you use the Hostinger File Manager or FTP to upload files and the Hostinger hPanel to create the database — SSH is used only for running Composer and Artisan commands.
Important: Use the pre-built ZIP — do NOT upload node_modules
The deployment ZIP already contains public/build/ (compiled frontend assets) and vendor/ (PHP dependencies). You do not need Node.js, npm, or Composer on the Hostinger server. Never upload the node_modules/ folder — it is ~500 MB and not needed on the server.
-
1
Create a MySQL Database in hPanel
Log in to your Hostinger account → go to hPanel → Databases → MySQL Databases. Click Create a new MySQL database & user. Write down the database name, username, and password — you will need them in the installation wizard.
The database host on Hostinger is typically
127.0.0.1. -
2
Upload the Files
In hPanel, go to File Manager and navigate to the
public_htmlfolder (or a subdomain directory if you're installing on a subdomain). Upload the deployment ZIP and extract it there.After extraction, the file structure should look like:
textpublic_html/ ├── app/ ├── bootstrap/ ├── config/ ├── database/ ├── public/ ← web root should point here │ ├── build/ ← compiled frontend (must exist) │ └── index.php ├── resources/ ├── routes/ ├── storage/ ├── vendor/ ← PHP dependencies (must exist) ├── .env.example └── artisanIf you are installing in a subdomain, set the subdomain's document root to point to the
public/folder inside the uploaded directory. Do this in hPanel → Subdomains → Edit → Document Root. -
3
Configure .env via File Manager
In File Manager, find
.env.example, duplicate it and rename the copy to.env. Open.envand set at minimum:envAPP_NAME="Deprixa Plus" APP_ENV=production APP_DEBUG=false APP_URL=https://yourdomain.com DB_CONNECTION=mysql DB_HOST=127.0.0.1 DB_PORT=3306 DB_DATABASE=your_database_name DB_USERNAME=your_database_user DB_PASSWORD=your_database_passwordLeave
APP_KEYblank for now — you will generate it via SSH in the next step. -
4
Connect via SSH and Generate App Key
In hPanel, go to Advanced → SSH Access to get your SSH credentials and enable SSH if not already active. Then connect from your terminal:
bash — your local terminalssh username@yourdomain.com -p 65002Once connected, navigate to the project folder and generate the app key:
bash — SSH session on Hostingercd ~/public_html # or ~/domains/yourdomain.com/public_html php artisan key:generate php artisan storage:linkIf you installed into a subdirectory (e.g.,
public_html/app/), adjust the path accordingly. Thestorage:linkcommand creates the symlink so uploaded files (logos, attachments) are publicly accessible. -
5
Set Directory Permissions via SSH
bash — SSH session on Hostingerchmod -R 775 storage bootstrap/cache -
6
Configure the Document Root
Hostinger must serve the
public/directory, not the root of the project. In hPanel:- For the main domain: go to hPanel → Hosting → Manage → Files → Document Root and set it to
public_html/public(if you placed the project files directly inpublic_html). - For a subdomain: go to hPanel → Subdomains → Edit → Document Root and point it to the
public/subfolder inside your uploaded directory.
If your hosting plan does not allow changing the document root, you can move the contents of the
public/folder intopublic_html/and updatepublic/index.phppaths — but this is not recommended. Using a subdomain with the correct document root is the cleanest approach. - For the main domain: go to hPanel → Hosting → Manage → Files → Document Root and set it to
-
7
Run the Installation Wizard
Open your browser and navigate to
https://yourdomain.com/install. Follow the 5-step wizard. In Step 3, enter the database credentials you created in Step 1 of this guide.Cron Job on Hostinger
After installation, add a cron job in hPanel → Advanced → Cron Jobs. Set the command to:
php ~/public_html/artisan schedule:runand the interval to every minute (use the "Once per minute" preset). This is required for scheduled notifications and auto-status updates to work.
Environment Variables Reference (.env)
All configuration is done through the .env file at the project root. Never commit this file to version control. Database credentials entered in the installation wizard are written to this file automatically.
Application Settings
| Variable | Example Value | Description |
|---|---|---|
| APP_NAME | Deprixa Plus | Application name shown in emails, browser tab, and UI header. |
| APP_ENV | production | Set to production on live servers. local for development. Controls error verbosity. |
| APP_KEY | base64:… | Auto-generated by php artisan key:generate. Never change on production — all encrypted data will become unreadable. |
| APP_DEBUG | false | Set to false in production. When true, detailed error stack traces are shown to users — a major security risk. |
| APP_URL | https://app.yourdomain.com | Full URL of your installation including protocol. Used for asset URLs, email links, and API base paths. |
Database
These values are written automatically by the installation wizard when you complete Step 3. You can also set or update them manually here.
| Variable | Example Value | Description |
|---|---|---|
| DB_CONNECTION | mysql | Database driver. Supported: mysql, mariadb. |
| DB_HOST | 127.0.0.1 | Database server hostname or IP. Use 127.0.0.1 for local, or your RDS/Cloud DB endpoint. |
| DB_PORT | 3306 | MySQL default port. Change if your DB server uses a non-standard port. |
| DB_DATABASE | deprixa | Name of the database. The wizard creates it automatically if it does not exist. |
| DB_USERNAME | deprixa_user | Database user. Should have SELECT, INSERT, UPDATE, DELETE, CREATE, DROP, INDEX privileges. |
| DB_PASSWORD | str0ngP@ssword! | Database user password. Use a strong, randomly generated password. |
Cache, Session & Queue
| Variable | Example Value | Description |
|---|---|---|
| CACHE_DRIVER | redis | Cache backend. Options: redis (recommended), file, database, array. |
| SESSION_DRIVER | redis | Session storage. Options: redis (recommended), file, cookie, database. |
| QUEUE_CONNECTION | redis | Queue backend for background jobs (notifications, exports). Options: redis, database, sync. |
| REDIS_HOST | 127.0.0.1 | Redis server hostname. |
| REDIS_PORT | 6379 | Redis port. Default is 6379. |
| REDIS_PASSWORD | null | Redis authentication password. Set to null if no password is configured. |
Mail Configuration
| Variable | Example Value | Description |
|---|---|---|
| MAIL_MAILER | smtp | Mail driver. Options: smtp, ses (AWS), mailgun, log (dev only), array. |
| MAIL_HOST | smtp.mailgun.org | SMTP server hostname. Use your ESP's SMTP endpoint. |
| MAIL_PORT | 587 | SMTP port. 587 (TLS/STARTTLS) is standard. 465 for SSL. 25 for unencrypted (not recommended). |
| MAIL_ENCRYPTION | tls | Encryption method: tls or ssl. |
| MAIL_USERNAME | postmaster@yourdomain.com | SMTP authentication username (usually your email address or API key). |
| MAIL_PASSWORD | your-smtp-password | SMTP authentication password. |
| MAIL_FROM_ADDRESS | noreply@yourdomain.com | The "From" email address for all outgoing system emails. |
| MAIL_FROM_NAME | Deprixa Plus | The "From" display name shown in email clients. |
File Storage (Optional S3)
By default, uploaded files (logos, attachments) are stored on the local server filesystem. To use AWS S3 or a compatible object storage service instead, set the following variables.
| Variable | Example Value | Description |
|---|---|---|
| FILESYSTEM_DISK | local | Default disk for file storage. Options: local (server filesystem) or s3 (AWS S3 or compatible). |
| AWS_ACCESS_KEY_ID | AKIA… | AWS IAM access key. Required only when FILESYSTEM_DISK=s3. |
| AWS_SECRET_ACCESS_KEY | wJalrX… | AWS IAM secret key. Required only when using S3. |
| AWS_DEFAULT_REGION | us-east-1 | AWS region where your S3 bucket is located. |
| AWS_BUCKET | deprixa-files | Your S3 bucket name. |
| AWS_URL | https://deprixa-files.s3.amazonaws.com | Public base URL for your S3 bucket. Used to generate file URLs. |
First-Run Checklist
After the installation wizard completes, log in with the admin account you created and finish these steps before going live:
- Set your company logo and contact details (Settings → Company Profile)
- Configure your mail settings and send a test email (Settings → Notifications)
- Review your timezone and date format (Settings → Locale)
- Create at least one branch (Settings → Branches)
- Configure shipment service types (Settings → Services)
- Create additional user accounts and assign roles (Settings → Users)
- Set up SSL (Let's Encrypt with Certbot is free and recommended)
- Configure a cron job for scheduled tasks (see below)
- Set up a queue worker for background jobs (Supervisord recommended)
- Test the shipment creation workflow end-to-end
Cron Job for Scheduled Tasks
Add the following entry to your server's crontab (crontab -e as the web server user or root):
* * * * * www-data php /var/www/deprixa-plus/artisan schedule:run >> /dev/null 2>&1Queue Worker (Supervisord)
For production, use Supervisord to keep the queue worker running. Create /etc/supervisor/conf.d/deprixa-worker.conf:
[program:deprixa-worker]
process_name=%(program_name)s_%(process_num)02d
command=php /var/www/deprixa-plus/artisan queue:work redis --sleep=3 --tries=3 --max-time=3600
autostart=true
autorestart=true
stopasgroup=true
killasgroup=true
user=www-data
numprocs=2
redirect_stderr=true
stdout_logfile=/var/log/deprixa-worker.log
stopwaitsecs=3600
Common Installation Errors
| Error | Cause | Fix |
|---|---|---|
| License verification fails | Wrong purchase code or Envato username, or the license server cannot be reached. | Double-check the purchase code (UUID format) and your exact Envato username. Verify the server has outbound internet access on port 443. |
| Database connection fails in wizard Step 3 | MySQL is not running, the credentials are wrong, or the host is incorrect. | Run systemctl status mysql. Verify the host, port, username, and password. Use 127.0.0.1 instead of localhost for TCP connections. |
No application encryption key has been specified |
APP_KEY is empty in .env. | Run php artisan key:generate. Ensure the .env file exists. |
| White page / 500 error | Storage or bootstrap/cache is not writable. | Run chmod -R 775 storage bootstrap/cache and ensure the web server user owns these directories. |
Class "App\Models\..." not found |
Composer autoloader is outdated. | Run composer dump-autoload --optimize. |
| Assets not loading (404 on /build/*.js) | npm run build was not run or the public/build directory is missing. | Run npm install && npm run build. Verify that public/build/manifest.json exists. |
| Images/logos not loading (404 on /storage/...) | Storage symlink not created. | Run php artisan storage:link. Verify that public/storage is a symlink. |
TokenMismatchException / 419 Page Expired |
CSRF token mismatch, usually because SESSION_DRIVER is misconfigured. | Verify CACHE_DRIVER and SESSION_DRIVER in .env. If using Redis, ensure Redis is running. Run php artisan config:clear. |
| Email not being sent | MAIL_* settings are wrong or queue worker is not running. | Check MAIL_* variables. Verify SMTP credentials with a tool like MailTrap. Ensure queue worker is running if using async queues. |
Permission denied when writing files |
Web server user does not own the storage directory. | Run chown -R www-data:www-data storage bootstrap/cache. |
Next Steps
With installation complete, explore the Settings module to configure your company profile, branding, and shipment services. Then read the Shipments module documentation to understand the core workflow.